stencil
Template file syntax
In Stencil your template files are DOCX documents. Therefore, you can edit the templates in any word processing software, like LibreOffice.
This is a quick introduction to the syntax of the language used by Stencil.
Substitution
Syntax: {%=EXPRESSION%}
You can use this form to embed textual value in your template. The EXPRESSION
part can be a variable name, function calls or a more complex mathematical expression.
Examples:
- Insert the value of the
partnerNamekey:{%=partnerName%} - Insert the circumference of a circle with radius under the
rkey:{%= r * 3.1415 * 2%}
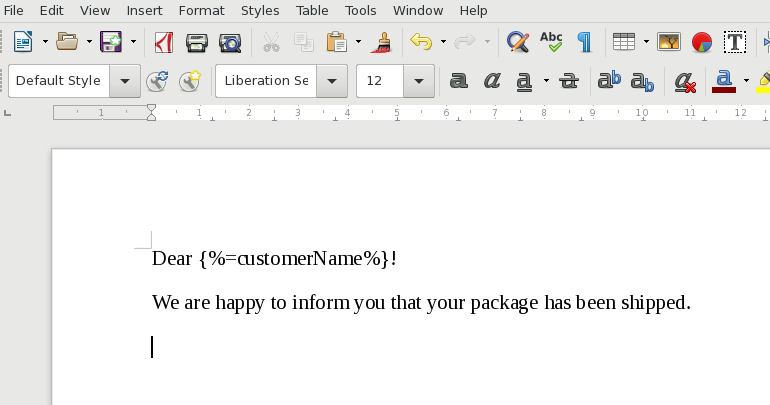
So you can write this in a template file:

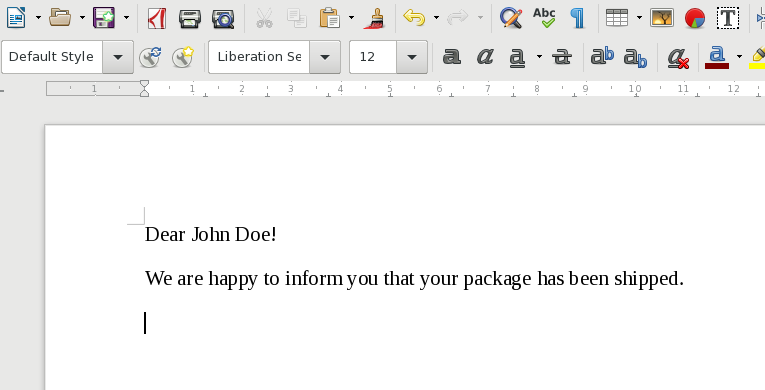
After applying Stencil with input data {"customerName": "John Doe"} you get this document:

Nested field access
You can reference values from nested fields by writing a dot separator between the field names. For example: customer.name can be used to reference the value "John" in {"customer": {"name": "John"}}
When the field name contains special characters, it may not be possible to reference it in a syntactically correct way directly. In these cases, the special curly braces operator can be used for property access. Syntax is field1[field2]. The expression field2 will also be evaluated, so you need to quote the expression if it is not a dynamic vale. For example: customer['name'].
Control structures
You can embed control structures in your templates to implement advanced templating logic. You can use it to repeatedly display segments or conditionally hide parts of the document.
Conditional display
This lets you conditionally hide or show parts of your document.
Syntax:
{%if CONDITION%}THEN{%end%}{%if CONDITION%}THEN{%else%}ELSE{%end%}
Here the THEN part is only shown when the CONDITION part is evaluated to a
true value. Otherwise the ELSE part is shown (when specified).
- True values: everything except for
falseandnull. Even an empty string or an empty array are true too! - False values: only
falseandnull.
Example:
{%if x.coverData.coverType == "LIFE"%}Life insurance{%else%}Unknown{%end%}
In this example the text Life insurance is shown when the value
of x.coverData.coverType is equal to the "LIFE" string.
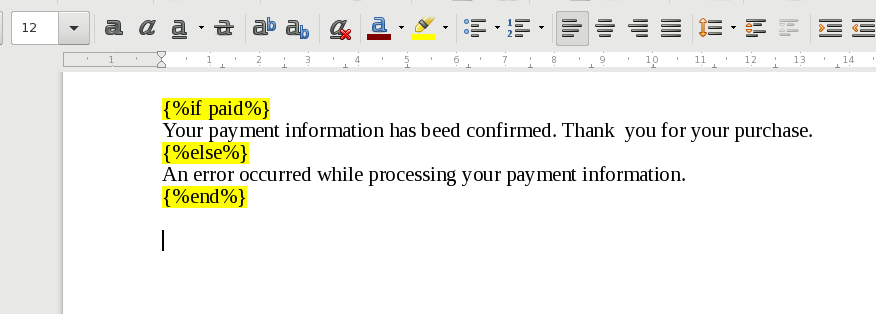
You can also set a highlight color for the control markers. They markers will be
hidden after evaluating the template document, however, they make easier to
maintain the template file. Color coding the matching if and else pairs
also make it easier to understand a template if it gets complicated.

Elseif
Elseif, as its name suggests, is a combination of else and if. Instead of nesting if expresisons
in else branches, you can simply write an elseif expression and close it with one end.
For example:
{% if CONDITION1 %} THEN do this
{% else if CONDITION2 %} Or do this
{% else %} Or if none of the conditions matched, do this.
{% end %}
There are multiple supported syntaxes: else if, elseif, elsif, elif.
Reverted conditionals
Sometimes it makes sense to swap the THEN and ELSE branches to make the expression more readable.
You can write unless instead of if ! (if-not) to express the negation of the condition.
For example, {%unless CONDITION%} Apples {%else%} Oranges {%end%} is the same as {%if ! CONDITION%} Oranges {%else%} Apples {%end%}.
You should also write unless if you would write if ! but witout an ELSE part.
For example, {%unless CONDITION%} Apples {%end%} is the same as {%if ! CONDITION%} Apples {%end%} but easier to read.
Iteration
You can iterate over the elements of a list to repeatedly embed content in your document. The body part of the iteration is inserted for each item of the list.
Syntax:
{%for x in elements %}BODY{%end%}
In this example we iterate over the contents of the elements array.
The text BODY is inserted for every element.
Iteration with index
A special syntax is implemented for iterating over a collection (vector or map) with the indices bound to a new variable. Syntax:
{%for idx, x in elements %}BODY{%end%}
Finding errors
- Check that every control structure is properly closed!
- Check that the control code does not contain any unexpected whitespaces.